Accounts Payable- Vendors
Vendors
Accounts Payable > Maintenance > Vendors
Individual vendor information is required for payment and/or purchase order processing. Vendor records contain information both for use in Dsys and user reference information. Individual invoice processing can be made easier by the detail entered into each vendor master record.
The minimum required a/p information for each vendor is:
- Code
- Name
- Checkbook
- Accounts Payable G/L
- Discount G/L
- NOTE: The Save button saves information on all tabs and needs to be done only once before closing.
View opens to #1 Properties Tab
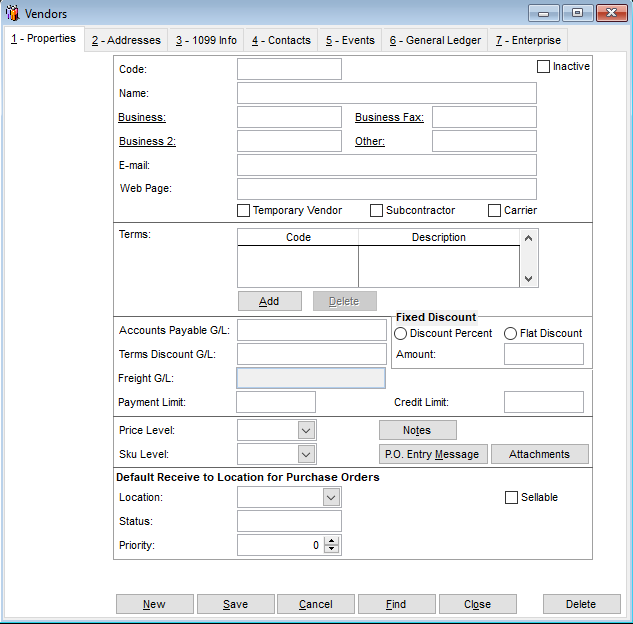
# 1 - Properties
· Enter the Code (up to 10 alphanumeric characters).
· Enter the Name as wanted on a check (or purchase order).
· Enter phone numbers for reference.
· Enter option e-mail and web address for reference.
· Temporary Vendor and Subcontractor check boxes are for reference only.
· Carrier check box allows this vendor to be entered as carrier on AR sales orders.
· To add Terms, select Add, select term (see terms setup in this documentation),
and click OK.
Dsys will automatically calculate due dates based on the terms entered
here. This is an option, but will greatly ease data entry of invoices when
used.
· Accounts Payable GL and Terms Discount GL will default from
Maintenance>Accounts Payable>Setup information, but may be changed here.
· Payment Limit will cause an warning message to generate whenever a payment
is attempted that is greater than the limit entered for this vendor.
· Fixed Discount amount is a discount that is always deducted from payment to
this vendor. It is over and above any cash terms discount calculated by the
terms setup. The fixed discount may be either a percentage of the invoice or a
fixed amount. Select type of fixed discount and enter the amount.
· Notes is an option field. Click on Notes button to use. Information does not print
anywhere
· Lower section is used for purchase order module.
______
# 2 - Addresses
The address
used when
check is
printed.
Information
fields only.
Vendor – Addresses
· Remittance Address is used for vendor payments.
· Shipping Address and Other Address are reference fields not used by Dsys.
______
# 3 - 1099 Info
1099 information entered here will default to invoice entry (may be edited at invoice
entry) for this vendor. Invoices marked for 1099 will be included when processing
Miscellaneous Income 1099’s for vendors. The information must be entered prior to
posting and paying the invoice. If a vendor invoice needs a different type of 1099 box
selection, the box can be changed at invoice entry. Single invoices needing different
boxes, or partial 1099 inclusion must be divided and entered separately.
þ To
indicate the
vendor may
receive a
1099
Tax ID
Select the
usual 1099
box for this
vendor
þ To mark
box 9 on
the 1099
Displays
the amounts
in the
system for
the year
selected
Vendor - 1099 Info
· Check 1099 Box if this vendor will require a 1099 form. The 1099 designation
will default to invoice entry window. The designation can be changed when
entering an invoice. A 1099 will print only when the 1099 box is checked when
the invoice is posted and paid. Note: Marking this box is not retroactive to any
paid invoice.
· Enter Vendor Tax ID number needed for 1099.
· Select Box type from drop down menu. Type may be changed at invoice entry.
· Right side allows user to view totals by year selected.
· Mark Box 9 check box if applicable.
_____
# 4 – Contacts
Option information tab only. Dsys does not use this data. Use for personnel information
for this vendor.
Enter detail
information
Click Add
or Edit to
enter
information
.
Vendor – Contacts Tab
______
# 5 - Events
Option information tab only. Dsys does not use this data. Use for tracking of events for
this vendor. The Dsys32 login name of the person making the entry will show in the
Created By column.
Enter detail
information
Add. Edit,
or Delete
Vendor – Events
# 6 - General Ledger
This tab is optional, but entering general ledger account information here will increase
efficiency during data entry of vendor invoices. The accounts selected will default into
the general ledger tab of invoice entry as a debit. The dollar amount of the vendor
invoice will also default, but can be amended during entry. If more than one account is
listed here, all the accounts will list at invoice entry, but can be deleted or changed at
that time. (The accounts payable liability credit also defaults in during entry for accrual
accounting.)
Select Add
to insert
general
ledger
number.
Vendor - General Ledger Tab
· Select Add for a new general ledger account entry. Account Lookup window will
appear.
· Highlight account wanted and click OK to return the choice to the tab.
· Repeat for additional accounts for this vendor.
______
# 7 – Enterprise
This option tab is for users with the Enterprise module. Enterprise accounts entered
here will default to the invoice entry information. The enterprise data may be added,
deleted or edited at invoice entry time. Accounts setup here will save time during data
entry of this vendor’s invoices.
Right click
in entry
fields to
bring up
lookup lists
for each
field.
.
Add to
enter a new
enterprise,
Edit to
change
existing,
and Delete
to remove
an
enterprise
from this
vendor.
Vendor – Enterprise Tab
· Click Add to enter enterprise account for this vendor.
· Entry window will appear. Right click in each field to access lookup lists, or enter
the known codes.
· Select OK to return information to the tab.
· Repeat for additional enterprise accounts for this vendor.
_______
Find an Existing Vendor Record
Maintenance>Accounts Payable>Vendors
· To locate an existing vendor, click Find at the bottom of the Vendors window.
The Find window opens.
Select Find
Now
without any
other field
criteria to
bring up list
of all
entered
vendors.
Enter
known
information
in any field
to narrow
the search.
To keep
data in the
grid while
accessing a
specific
vendor,
uncheck
this box.
Vendor Find Window
· Select Find Now without any selection criteria to bring up the list of all vendors.
· Enter information in other fields to narrow the search and then click Find Now.
· Highlight the vendor wanted and click Select to return the vendor information to
the vendor entry area.
· Note: If you will need to access more than one vendor from your resulting search
grid, uncheck the Close Window on Select box. The information in the grid will
remain for you to return to and select another record.
· Select Clear to clear the grid and do a different search.
· Select Close to exit the find window.
_______
Deleting a Vendor
File>Delete
This can be done only if a vendor has never been used. Use Find to locate the vendor in
Enter Vendors. With the vendor displayed, click on File>Delete. The system will verify
the vendor has not been used then show a warning message to be certain before
deleting.