Locations
Inventory Locations
A powerful feature of GrowPoint is the ability to track detailed inventory data at the location level. The Location Inventory Module provides an in-depth view of each item in inventory, with the ability to further break down the item quantities by location. For example, Acer Palmatum ‘Bloodgood’ 2” may be growing in three separate locations.
The ability to set up and track these item locations from growing through selling is an important part of nursery inventory management. Using the features of the Locations Module, each item can be set up to include as many location details as needed. Furthermore, sales orders can be allocated to specific locations and reports generated indicating what item location is required to ship an order.
Planning the detail of the locations inventory is the first step. If the locations are defined to be too complex, the results of your details may be too difficult to implement. If tracking locations at the row level, consider that this structure may create hundreds or thousands of field and row combinations. Do you really need this much detail at the location level?
Prior to setting up inventory, location codes must be created and saved through the Location Set up Screen. When the screen is selected from the Menu Bar, a list of previously entered locations appears. Keep in mind that the Locations screen is not defining the Item Locations, but only setting up the location records from which these are created.
To find an existing Location record, click the mouse into either the Code or Description column on the Inventory Locations Screen. Once a column is selected, the column heading changes color to yellow indicating the column search is active. To locate a Location record, start typing into the desired column. The first record matching the characters typed is found and highlighted.
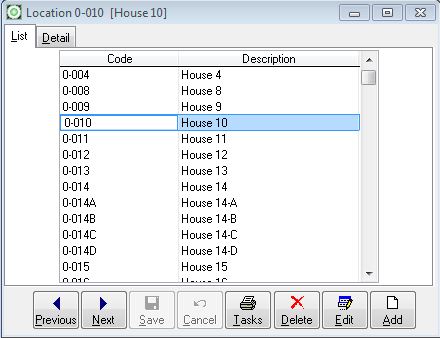 |
| Inventory Locations List |
To add a new Location record, press the Add Button.
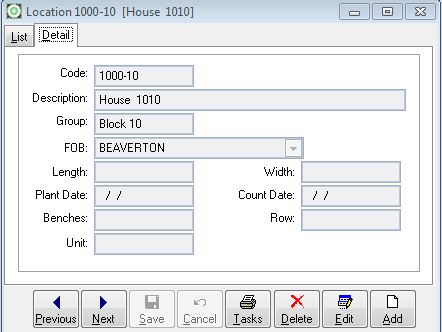 |
| Inventory Locations Detail |
Location Code – Each location is assigned a unique code to identify the location. Up to 12 character or number combinations may be used in the location code. Planning the structure of the location code is important. If setting up locations by farm or field, think about how the locations codes are to appear on the item screen or reports. Set up a code structure that is easily recognized. For example, if tracking locations by field and row within each farm, designate the first four characters of the location code to identify farm and the next four characters for row.
Field Row Location Code F001 R001 F001R001 F001 R008 F001R008
Description – Enter a description for the location. The description usually appears on reports so a detailed description may be necessary. Although 30 characters are available, consider using fewer characters as some reports may not print the entire location description. Group – This field is used by the Digging Module to identify the location as belonging to a particular group of locations. For example, suppose a farm manager is responsible to several locations, the ability to group the locations together is important on some Digging reports. FOB – This field is not used by the system and is reserved for future consideration. Length, Width, Etc. – These fields are not used by the system but may be defined for your own reporting needs.
Group – This field is used by the Digging Module to identify the location as belonging to a particular group of locations. For example, suppose a farm manager is responsible to several locations, the ability to group the locations together is important on some Digging reports.
FOB – This field is not used by the system and is reserved for future consideration.
Length, Width, Etc. – These fields are not used by the system but may be defined for your own reporting needs.
Related Articles