Accounts Receivable - Customers
Customers are the reason you are in business and tracking customer information is an essential part of doing business. In GrowPoint, information about customers is saved on a Customer record where the customer is assigned a unique code and information such as billing and shipping address is saved. Other information such as terms and discount rates are also saved on Customer records.
Prior to setting up a Customer records, you should complete the Accounts Receivable Set Up by creating salesman, sales tax, customer types and other information needed on customer records.
To add, change or delete Customer records, from the Main Menu select Accounts Receivable > Maintenance > Customers.
The Customer screen is arranged using Tabs to break the screen into sections. Each Screen Tab displays different information for each Customer record. In GrowPoint, most input screens have a List Tab and a Detail Tab. The List Tab is used to locate customer records that have already been created. Once a Customer record is found, the Detail Tab shows detail about the selected record. Other Customer Screen tabs are also available for entering order information, customer memos, and customer events.
To see information on any Screen Tab, click the Tab with your mouse or select the Tab using the keyboard shortcut keys. Keyboard shortcuts don’t require the use of your computer mouse to move around the screen. Notice that most of the Screen Tab titles have one character underlined like List, Detail, and Memos. Hold down the Ctrl key on the keyboard and press the underlined letter key to use the Keyboard shortcut. For example, the display the Detail Tab, press Ctrl-D.
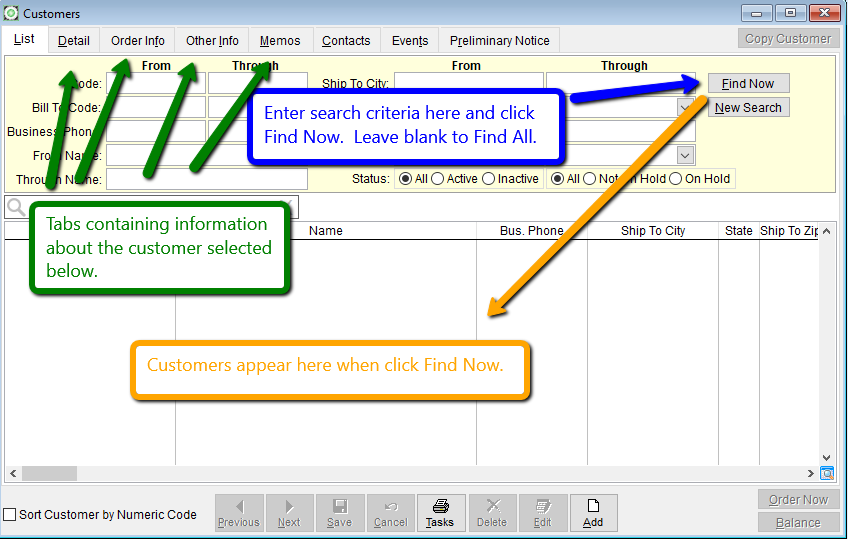
When searching for an existing Customer, the Search Criteria can help you quickly locate Customer records. Here are the steps to locate Customer records: 1. Enter Search Criteria for the Customer records to be located. You can enter any combination of codes in any of the Search Criteria fields. 2. Press the Find Now Button to instruct the system to locate the matching records. 3. Once the search is complete, choose the desired Customer record in the Search Results Area by double-clicking your mouse on the record. For example, if you are looking for a customer in the State of Maryland but didn’t remember the name, enter MD in the Ship to State field and press the Find Now button. All Customer records matching any of the search criteria appear in the Search Results Area. You can also combine search criteria to locate Customer records. Suppose you need to find all customers in the state of Ohio with a particular area code. Enter both of this information in the Search Criteria and “Find” the matching records.
When Customer records appear in the grid you may further refine your search by using the tools availble within the grid or by using the search ribbon.
Customer Detail
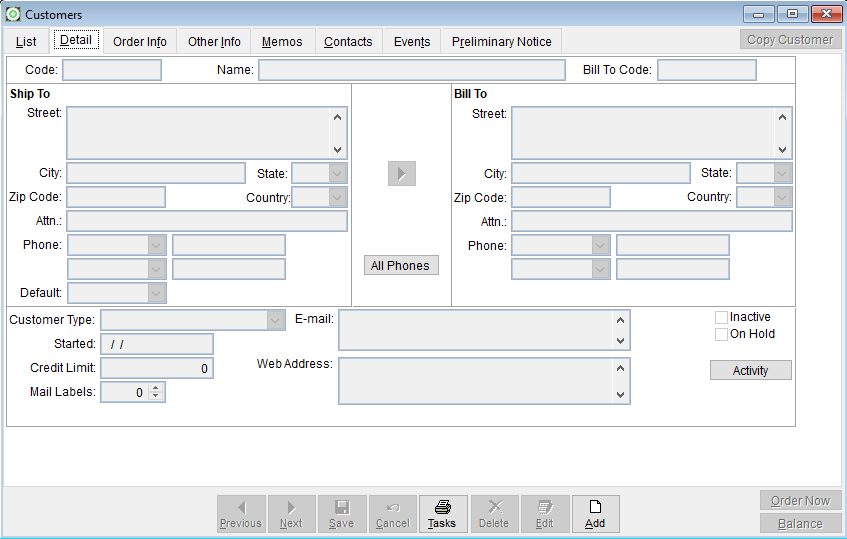
Customer Code: Customer codes are used to identify individual customer records and are typically used on screens like Sales Order Entry to record a transaction for a specific customer. Think of the Customer code as an abbreviated code to identify a customer. Instead of typing in the full customer name each time an order is entered, use a code to quickly retrieve the customer information. The code is limited to 10 characters that can be either letters or numbers or a combination of both. When creating Customer codes, think about how you want to look up customers. If you have hundreds of customers, think of a way to organize the customers so you can quickly find their information. One of the most common methods for creating customer codes is simply typing in an abbreviation for the customer name. If the customer name is Sam’s Garden Center, the code could simply be SAM. Many times, you have customers with the same name but in different locations. Consider adding the state to the end of the code to create a unique code for each customer. Another method for creating codes is to use the first four characters each part of a customers name. For example: Customer Name Customer Code Sam’s Garden Center SAMS GARD Plant Shack PLAN SHAC Ed Ashton Landscaping ED ASHT
Chain store customers also have some unique issues when creating Customer codes. In most situations, when you sell items to a chain store, the delivery is made to the store but the invoice is sent to a central location like the corporate office. For these types of customers, GrowPoint allows both the store and the corporate office to have different customer records. Create a Customer record for the Bill To, which is the corporate office then create additional Customer records for each of the stores. Here are some chain store Customer code examples: Customer Name Customer Code Lowes Corporate Office LOWES Lowes Store 134 LOWES0134 Lowes Store 199 LOWES0199 Home Depot Corporate HD0000 Home Depot # 312 HD0312 Home Depot # 409 HD0409 Most reports and look up screens in GrowPoint use the Customer code. For example, the Customer Aging and Statement reports sort according to this code. If using numeric codes, realize that these reports print in alphanumeric order. This order is often called the ASCII order. In ASCII order, numbers come before letters of the alphabet. Name: Enter the full name of the business or organization. This name appears on customer reports like invoices, statements, and sales history. Bill To Code: GrowPoint has an outstanding feature that lets two customer codes be associated with each other. This feature was designed for dealing with chain store customers. When entering sales orders, the sales order requires a Bill To Code as well as a Ship To Code. This is required because most chain store orders are shipped to an individual store (ship to) with invoices sent to the corporate office (bill to). In the above Customer code example, notice how both Lowes and Home Depot have records for both the corporate office and the individual stores? To save time during order entry, when an order is entered for Lowes Store 134, you can simply enter the Ship To Code on the order and if that Customer record has a Bill To Code, the system automatically fills in the Bill To Code.
Ship to and Bill to Address: Enter the ship to and bill to address for your customer record. The address is a memo field that can contain many lines of information for the street address. For example, a suite or apartment number may be entered in the address memo. The ship to and bill to addresses are different in case the customer wants orders delivered to a physical address but invoices mailed to a post office box or other address. For chain store customers, the corporate Customer record does not need a Ship to address because nothing is shipped to that address and the store Customer record does not need a Bill to address because invoices are not usually sent directly to the store. If the Ship to and Bill to Address are the same, use the Copy button to move the Ship to Address, city, state, and zip code to the Bill to address.
Phone Numbers: Each Customer record may contain up to 13 different phone numbers. The easiest method to view or edit them all is to click the 'All Phones' button on the center of the form. This will show all 13 numbers at the same time and will remain open, even if you move from one customer to another until you close it. The Default phone number on the ship to side of the customer master allows you to choose one of the 13 numbers to print on reports as the ship to number. It can be different for each customer.
Customer Type: Assign the Customer record a Customer Type from the list set up on the A/R Set up screen.Credit limit: Each Customer can be given a credit limit. This is for internal reference only. The system does not provide any warning or messages for customers exceeding the credit limit.
Started: Enter a beginning date or starting date for this customer. This information is not used by the system for reporting.
Inactive Customer: Some customers may not purchase from you often and should be considered inactive. The Mailing List Module provides an option to omit inactive customers from the mailing list.
Mail Labels: If you have purchased the Mailing List Module, enter the number of labels to print for each Customer record.
Customer Contacts When you sell items to a business, you sometimes deal with many different people who work for the customer. Keeping track of all these “Contacts” can get confusing. Although you remember names and job titles, the ability to keep detailed information about these people is also important. GrowPoint has the ability to set up a list of Customer contacts. The number of contact records that can be defined for each Customer is virtually unlimited. Some examples of contact names you may keep are owner, manager, buyer, grower, accounts payable, inventory manager, etc. To display the Customer Contact screen, press the Contacts button on the Customer screen.
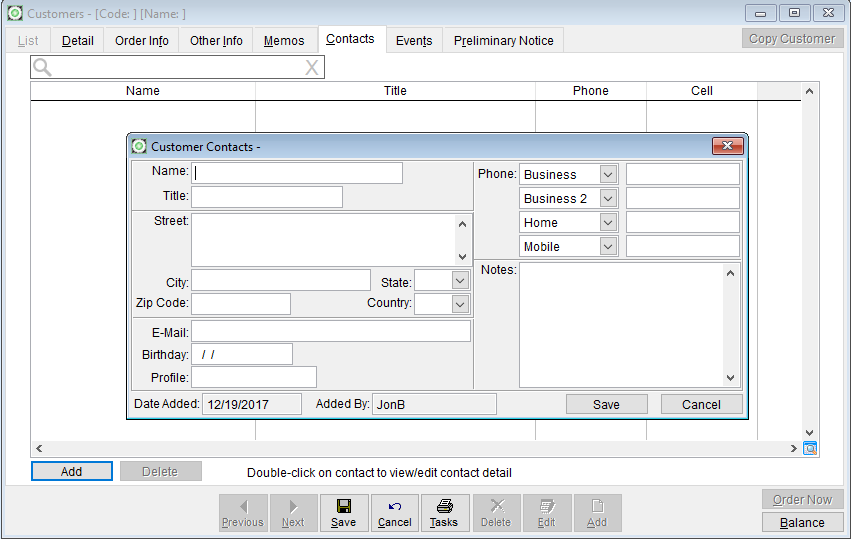 To add a new Contact, press the Add button.
To edit an existing Contact:
1. Choose the desired Contact from the Contact List screen.
2. Press the Edit button.
After making the required changes to the new or existing Contact record, press the save
button to save the changes.
Currently, there is no report in GrowPoint to display a list of Contacts by Customer.
Address information on the Contacts screen does not default from the Customer record. The
Street Address, City, State, and Zip Code must be reentered for each Contact.
Phone Numbers: Each Contact record may have up to 14 different phone numbers. The
system shows up to four phone numbers on the screen for each Contact.
Email: Enter the Contacts email address.
Notes: Miscellaneous information about a Contact can be entered in the Notes field.
To add a new Contact, press the Add button.
To edit an existing Contact:
1. Choose the desired Contact from the Contact List screen.
2. Press the Edit button.
After making the required changes to the new or existing Contact record, press the save
button to save the changes.
Currently, there is no report in GrowPoint to display a list of Contacts by Customer.
Address information on the Contacts screen does not default from the Customer record. The
Street Address, City, State, and Zip Code must be reentered for each Contact.
Phone Numbers: Each Contact record may have up to 14 different phone numbers. The
system shows up to four phone numbers on the screen for each Contact.
Email: Enter the Contacts email address.
Notes: Miscellaneous information about a Contact can be entered in the Notes field.
- Related Articles:
- Customer Order Info
- Customer Aging
- Sales Orders
- Payments
- Posting